
Castlevania: Belmont's Curse Shadow Work Achievement
Unlock the Castlevania: Belmont's Curse shadow work achievement by defeating the Self. Get combat tips, Custom Mode settings, and a cleanup checklist.
Jump to
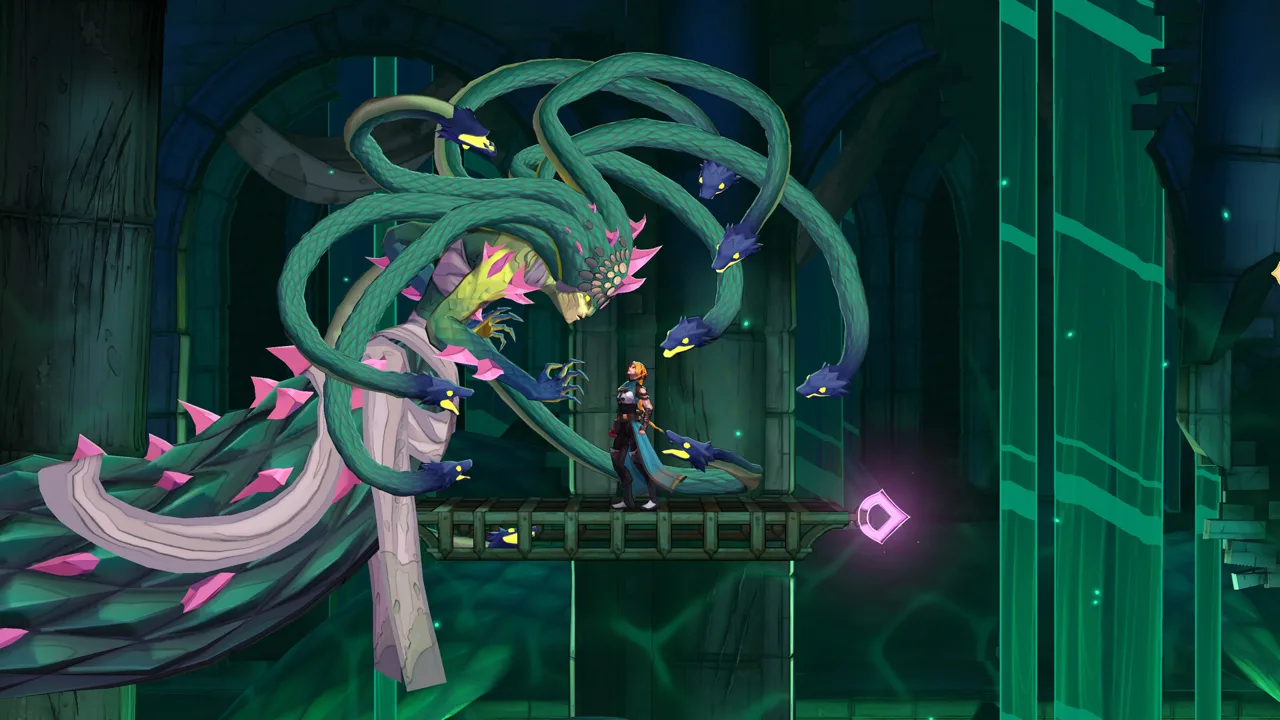
How to Unlock Shadow Work
The Castlevania: Belmont's Curse shadow work achievement unlocks when you defeat the Self. Identifying that target matters because another boss achievement uses a very similar name. To earn the Castlevania: Belmont's Curse shadow work achievement, keep your attention on the Self rather than the Shadow.
These are separate entries in the achievement list:
| Achievement | How to unlock |
|---|---|
| Shadow Work | Defeat the Self |
| Death… killed? | Defeat the Shadow |
| Die monster! You don’t belong in this world! | Defeat Dracula |
That distinction is the key to tracking this objective correctly. Beating the Shadow fulfills the requirement for Death… killed?, while Shadow Work belongs to the Self encounter.
The Shadow Work requirement is a boss defeat. Collection goals, endings, and the timed completion challenge have their own achievements, so give each objective its own place on your checklist.
On Steam, Belmont’s Curse has 29 achievements. The PlayStation trophy list has 30 trophies, including the Platinum awarded for earning every other trophy. Shadow Work contributes to that broader completion chase, but you can approach the fight as a focused combat objective.
Before another attempt, review your equipment and gameplay settings. Belmont’s Curse gives you several ways to adjust your combat setup, including seven weapon categories, Arcana spells, and Relics.
Official page: Castlevania: Belmont's Curse (konami.com)
Prepare Your Weapons, Arcana, and Combat Settings
For the Castlevania: Belmont's Curse shadow work achievement, build around a weapon whose spacing and animations you can manage consistently. The game supports different approaches, but each weapon’s reach changes how closely you need to stand to your target.
| Equipment option | Relevant mechanic | Preparation tip |
|---|---|---|
| Whip | Versatile attacks that reward distance management | Practice maintaining a comfortable striking distance. |
| Spear | Long reach with slower attack animations | Leave room for the slower animation before committing. |
| Cestus | Short reach that makes staying close easier | Equip it if you are comfortable fighting near your target. |
| Arcana | One spell can be equipped at a time | Choose the spell whose behavior you understand most clearly. |
| Relics | Effects include conditional health, damage, and mana benefits | Read each condition before combining your equipment. |
Avoid choosing equipment solely because its damage potential sounds appealing. A slower weapon asks you to account for its animation, while a short-range weapon asks you to spend more time close to danger. Pick the tradeoff you can handle.
Treat the slide as movement
Rose’s slide does not provide invincibility frames. Pressing it during an incoming attack does not automatically protect you.
Watch the enemy’s animation before sliding, and use the move to reach a safer position. Think about where Rose will finish the slide, especially when an attack is already underway.
The game’s shield-bearing enemies illustrate why timing matters: sliding beneath them works during a raised-shield attack, while an attack swung from underneath can catch you. Apply that same attention to animation during boss attempts, without assuming that every attack accepts the same response.
Use your spell deliberately
Only one Arcana spell can be equipped at a time. Combat milestones unlock blessings that can substantially change a spell’s performance.
For example, the cross-throw ability can be upgraded to throw two crosses, deal more damage at greater distance, and restore mana when caught based on enemies hit. Those are meaningful changes to how a spell fits into combat.
Review your equipped spell’s blessings before returning to a difficult encounter. Build your weapon and Relic choices around the spell’s actual effects, then practice using that combination consistently.
Make the action easier to read
Belmont’s Curse includes options to reduce screen shake and add outlines to Rose and enemies. Use those settings if effects make it difficult to follow movement.
Reduce visual distractions before changing your whole equipment setup. Clearer silhouettes can make it easier to watch positioning and attack animations, which matters when your slide offers no invincibility.
Keep your preparation focused: readable combat, familiar weapon timing, and a spell you know how to use.
Use Custom Mode to Reduce Repeated Attempts
Custom Mode does not disable trophies or achievements, so it remains an option while pursuing the Castlevania: Belmont's Curse shadow work achievement.
You can enable or disable it at any time through the gameplay settings.
- Pause the game.
- Open Settings.
- Select Gameplay.
- Check Enable Custom Mode.
- Adjust the options that address the part of combat causing trouble.
| Custom Mode option | Effect |
|---|---|
| Allow Respawn In Front Of Boss Doors | Offers a respawn outside the boss door after defeat. |
| Damage Dealt | Adjusts outgoing damage, including increases up to five times. |
| Maximum Number Of Potions | Changes potion capacity to a maximum of five. |
| Prevent Death | Makes Rose invincible. |
| Damage Received From Enemies | Adjusts damage taken from enemies and bosses. |
| Experience Gained | Increases experience earned by up to three times. |
Start with Allow Respawn In Front Of Boss Doors if traveling back to an encounter is interrupting your practice. It addresses the return trip while leaving you free to learn the fight.
Increase potion capacity if you want more healing available. Reduce incoming enemy damage if individual mistakes are ending attempts too quickly. Increase outgoing damage if you want to shorten the encounter.
For a completion-focused approach, Prevent Death removes the risk of being killed. Choose the settings that match your goal, whether you want room to practice or simply want to complete the achievement requirement.
Custom Mode also includes a separate setting for damage received from traps. Keep that distinction in mind when adjusting difficulty: enemy damage and environmental damage have separate controls.
The menu warns that these changes can affect the intended experience, but achievement eligibility remains intact.
Track Shadow Work Alongside Related Achievements
Keep the Castlevania: Belmont's Curse shadow work achievement separate from your equipment, collection, and ending goals. Defeating the Self completes its named objective; the larger achievement list asks for several different kinds of progress.
 Image: Steam / KONAMI
| Achievement | How to unlock |
|---|---|
| Shadow Work | Defeat the Self |
| Pick a card, any card | Unlock every blessing for every Arcana. |
| Armed to the Fangs | Find every weapon. |
| Jack of All Trades | Find a weapon from each weapon family. |
| Stuff of Legends | Find a legendary weapon. |
| Collector | Find every health and mana upgrade. |
| The Greatest Detective | Find every clue. |
| Narcissus | Activate every mirror of life. |
| Perfectionist Hunter | Reach 100% game completion. |
Use this distinction to keep your cleanup organized. Finding a weapon from each family fulfills a different requirement from finding every weapon. Likewise, collecting Arcana and completing their blessing requirements are different tasks.
Exploration supports several of these goals. Belmont’s Curse contains hidden areas, shortcuts, equipment, and clues presented through drawings, riddles, and ghost accounts. Some clues help solve environmental puzzles that lead toward bosses.
Read those clues carefully instead of treating every blocked route as a combat problem. Follow the location or puzzle detail they describe, and return to exploration when you want additional equipment or upgrades.
For a compact tracking list, use these categories:
- Bosses: Keep the Self and the Shadow as distinct targets.
- Equipment: Track weapon families, individual weapons, and legendary weapons.
- Arcana: Review blessing requirements for every spell.
- Exploration: Track clues, mirrors of life, and health and mana upgrades.
- Completion: Keep ending objectives and the timed finish visible.
The world allows substantial freedom in the order you explore and tackle bosses. Organize your checklist around completed objectives rather than forcing every discovery into one rigid route.
Build Your 100% Completion Order
After earning the Castlevania: Belmont's Curse shadow work achievement, use a completion order that separates exploration-heavy work from the under-four-hour challenge. Treat the order below as a planning checklist for the achievement requirements.
| Planning order | Objective | Achievement targets |
|---|---|---|
| Establish your combat setup | Use weapons, Arcana, and Relics you can handle consistently. | Prepare for boss-defeat objectives, including Shadow Work. |
| Work through boss objectives | Defeat the named targets on the achievement list. | The Self, the Shadow, Dracula, and the other boss targets. |
| Complete exploration cleanup | Find weapons, upgrades, clues, and mirrors of life. | Armed to the Fangs, Collector, The Greatest Detective, Narcissus. |
| Complete spell milestones | Finish blessing requirements for every Arcana. | Pick a card, any card. |
| Track ending objectives | Finish the game with each named ending. | Belmont’s fall, The hunt goes on, Curse lifted. |
| Review remaining goals | Reach full completion and address the timed challenge. | Perfectionist Hunter and Dialog Skipper. |
Keep the three endings distinct
The achievement list includes separate rewards for the bad, normal, and true endings:
- Belmont’s fall: Finish with the bad ending.
- The hunt goes on: Finish with the normal ending.
- Curse lifted: Finish with the true ending.
Track each by its achievement name. Defeating a particular boss and finishing with a particular ending are separate checklist entries.
Give the timed challenge its own preparation
Dialog Skipper requires finishing the game in less than four hours. Plan that objective around familiarity with traversal, combat, and the routes you intend to take.
Use exploration time to learn room connections and shortcuts. Avoid turning every unfamiliar puzzle into a timed-run problem; investigate clues while working through your broader collection goals.
Review the smaller counters
Other objectives include destroying 666 candles, covering 19.86 km, and killing an enemy with the Fallen’s Arcana spell while a whip is equipped.
That last requirement belongs to True Belmont. Check both parts of the setup: equip a whip and use the Fallen’s spell for the kill.
Before calling your checklist complete, review the individual requirements for bosses, equipment, spell blessings, collectibles, endings, and the timed finish. Mark Shadow Work complete when you defeat the Self, then move on to the remaining objectives.
FAQ
How do you unlock the Castlevania: Belmont's Curse shadow work achievement?
Defeat the Self. Shadow Work is the achievement attached to that boss-defeat requirement.
Is Shadow Work awarded for defeating the Shadow?
Defeating the Shadow unlocks Death… killed? The Self is the target associated with Shadow Work, so track these as separate boss objectives.
Can you use Custom Mode for the Castlevania: Belmont's Curse shadow work achievement?
Yes. Custom Mode leaves trophies and achievements enabled. Open Settings → Gameplay → Enable Custom Mode to adjust damage, potion capacity, boss-door respawns, and other options.
Does Shadow Work require finishing the game in under four hours?
The listed Shadow Work requirement is defeating the Self. The under-four-hour finish belongs to Dialog Skipper, which is a separate achievement.
Continue with
 Castlevania: Belmont's Curse Tips: Beginner's GuideCastlevania: Belmont's Curse tips to master combat, find hidden fast travel, upgrade Rose, and manage potions. Start exploring Paris with fewer setbacks.
More in Guide
Castlevania: Belmont's Curse Achievements: Full Guide
Track Castlevania: Belmont's Curse achievements with the full trophy list, collectible goals, ending requirements, and a clear route to 100% completion.
Castlevania: Belmont's Curse Difficulty: How to Adjust
Castlevania: Belmont's Curse difficulty explained: adjust Custom Mode, handle early combat, tackle Builder's chase, and learn when to dodge boss attacks.

Castlevania: Belmont's Curse Reddit: Controls Guide
Castlevania: Belmont's Curse reddit guide covering dodge timing, controller issues, Arcana cards, exploration, and what to check before buying. Get ready.
Castlevania: Belmont's Curse Review: Worth Your Time?
Castlevania: Belmont's Curse review covering combat, exploration, tarot spells, difficulty, and performance. See if Rose Belmont's adventure suits you.
Join the community
Official channels for news, updates and player help: